Clearent JavaScript SDK
Apple Pay For Web
Apple Pay For Web Overview
Apple Pay for Web allows customers to securely make payments using Apple Pay on their Apple device’s Safari browser. This guide highlights the minimum changes needed for Apple Pay.
Audience
This guide is intended for developers/solutions that plan to, or already are, integrated with the javascript-sdk.
Prerequisites
The following are required before you incorporate Apple Pay on your website:
· Ensure that the macOS version is 10.12.1+ or iOS version is 10.1+ for the Apple Pay payment method. The mac OS supported are Sierra and later.
· This payment method is supported only on Apple device’s browser such as Safari.
· Ensure that your server is set up to allow Apple Pay.
· Serve your application over HTTPS both in development and in production.
· Your domain must have a valid SSL certificate.
· Your server must support the Transport Layer Security (TLS) protocol version 1.2 or later, and one of the cipher suites. Refer to the related links for the list of cipher suites.
· Refer to Apple Server Configurations for setting up your production environment.
· It is recommended that integrators implement the manual card entry of the JavaScript SDK solution as a fallback measure.
Supported and Unsupported Payment Methods
Collect payment and address information from customers who use Apple Pay. The supported cards and merchant capabilities are as follows:
· Supported Cards – Visa, MasterCard, American Express, and Discover
· Merchant Capabilities – Credit Cards, Debit Cards (with either the Visa or Mastercard logo)
The unsupported methods are:
· In-App Payments
· Recurring Payments
· Split Shipment
· Voids/Refunds through Apple Pay
Getting Started
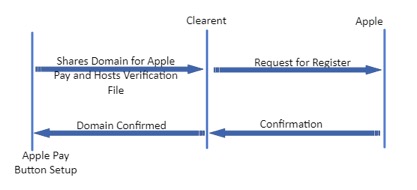
Figure 1 Final Transaction Cost
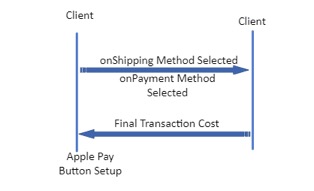
Figure 2 Final Transaction Cost
Note
· The merchant is responsible for ensuring the transaction worked as expected.
· Apple’s documentation for Apple Pay on the Web describes the process of “merchant validation”, which Clearent manages behind the scenes. You don’t need to create an Apple Merchant ID, CSR, etc., as described in their documentation and should instead just follow the steps below.
1. Share with Clearent the domain(s) that will be used for Apple Pay.
Note
Refer to the Related Links for the list of Apple IP Addresses and domain names for merchant validation in production and testing.
2. Host
the verification file (provided by Clearent) on the following URL,
replacing [DOMAIN_NAME] with the appropriate domain.
Example:
https://[DOMAIN_NAME]/.well-known/apple-developer-merchantid-domain-association
Note
This URL must be publicly accessible to allow Apple to verify the file. Refer to the Related Links section to see the list of Apple IP addresses.
3. Once the provided file is hosted at the correct URL, send a notification to Clearent to request Apple to register and verify the domain.
4. Clearent will send confirmation once the domain has been verified.
Setting Up Apple Pay
Placing the Apple Pay button on your page
1. Include this in your page to create a container that will be used for the Apple Pay button:
|
<button id="apple-pay-button" class=""></button> |
Note
You will get a default style. Apple provides several types of buttons so that you can choose the button type that fits best with the terminology and flow of your purchase or payment experience. Refer to the following link for Apple styling guidelines:
Refer to the following link for full payment sheet objects:
https://applepaydemo.apple.com/
Note
You don’t have to provide the full request. An example of a minimum request is:
|
{ "total": { "label": "AAA", "type": "final", "amount": "1.99" } } |
2. Check if Apple Pay is available in the user’s browser by using the function. This enables you to determine when to show the Apply Pay button.
|
ClearentSDK.applePayAvailable() |
Configuring the onClick event
1. To start up the Apple Pay session with your payment sheet object, configure the onClick event.
|
if(ClearentSDK.applePayAvailable()) { let applyPaymentSheet = YOUR_PAYMENT_SHEET
jq2("#apple-pay-button").on("click", () => { const session = ClearentSDK.buildApplePaySession(applyPaymentSheet); // optional dynamic handling events can be added here (see below for details) session.begin() }); } |
2. The SDK handles the Apple Pay token and converts it to the JWT you currently handle. Otherwise, you will get an error. If you have not already integrated the JavaScript SDK, follow the steps here and then follow the steps in this document. Else, there should be no extra work at this point.
|
function ClearentTokenSuccess(raw, json) { console.log("ClearentTokenSuccess"); console.log(raw); console.log(json);
console.log("-----------------------------------------------"); console.log("now you can send the token to your server"); console.log("to complete the transaction via mobile-gateway"); console.log("-----------------------------------------------") }
function ClearentTokenError(raw, json) { console.log("ClearentTokenError"); console.log(raw); console.log(json);
} |
3. Send the Clearent token to your server using the secure transmission you use elsewhere (HTTPS and the authentication solution).
4. From your server, construct the payment (see Mobile Gateway documentation for more details). Share with Clearent the secret API key from your server, not from your website.
5. When you get a successful token response, return the response to the JavaScript to be handled appropriately.
Testing
Apple requires an offline test implementation of Apple Pay for apps, websites, and point-of-sale systems. The link here provides an overview of the sandbox environment, details on how to get started, and general support for testing your Apple Pay transactions.
Dynamic Updates
1. The Apple Pay session has been exposed for you to calculate your final transaction cost depending on user payment method, billing address, shipping address, or shipping method. To modify the payment sheet, implement the optional handlers onpaymentmethodselected, onshippingmethodselected and onshippingcontactselected. There is also the oncancel optional handler that is triggered when the user clicks the “cancel” button. This is implemented similarly to the other handlers. Refer to the Apple documentation for more details on the methods.
Example
|
jq2("#apple-pay-button").on("click", () => { const session = ClearentSDK.buildApplePaySession(request);
session.onshippingmethodselected = function (event) { selectedShippingMethod = event.shippingMethod const newTotalAmount = calculateTotal…. const newLineItems = [update line items…] session.completeShippingMethodSelection( { newTotal: { label: request.total.label, amount: newTotalAmount, type: final }, // newTotal is required newLineItems, } ) }
session.oncancel = function(event) { …add logic for when session is cancelled by user } …. Other optional handlers can be added here session.begin() }); |
Example (detailed payment request)
|
let applyPaymentSheet = { shippingMethods: [ { "label": "Free Standard Shipping", "amount": "0.00", "detail": "Arrives in 5-7 days", "identifier": "standardShipping" }, { "label": "Express Shipping", "amount": "1.00", "detail": "Arrives in 2-3 days", "identifier": "expressShipping" } ], "shippingType": "shipping", "requiredBillingContactFields": [ "postalAddress", "name", ], "requiredShippingContactFields": [ "postalAddress", "name", "phone", "email" ], "lineItems": [ { "label": "Sales Tax", "amount": "0.00" }, { "label": "Shipping", "amount": "0.00" } ], "total": { "label": "AAA", "amount": "1.00", "type": "final" } } |
Appendix A – Related Links
Refer to the following table for links to helpful resources:
|
Description |
|
|
Clearent JavaScript SDK |
|
|
Apple Developer Documentation |
https://developer.apple.com/documentation/apple_pay_on_the_web |
|
Clearent Apple Pay Demo |
https://gateway-sb.clearent.net/js-sdk/applepaydemo.html (open in Safari) |
|
Apple IP Addresses |
https://developer.apple.com/documentation/apple_pay_on_the_web/setting_up_your_server
|
|
Apple Styling Guidelines |
|
|
Apple Server Configurations |
|
|
Clearent Mobile Gateway Documentation |
|
|
Clearent Example Code |
|
|
Apple Sandbox Environment |